How to set camera permissions
Camera permissions are a fundamental aspect of privacy and security when it comes to using camera-enabled devices such as smartphones, tablets or computer. Camera permissions allow apps or websites to access and utilize the camera functionality on your device.
When you grant Dojah camera access to your device, it allows Dojah scan your documents for verification and capture your face for biometrics verification.
Allowing camera access for:
- Google Chrome
- Mozilla Firefox
- Safari
- Mobile devices
- General
Google Chrome
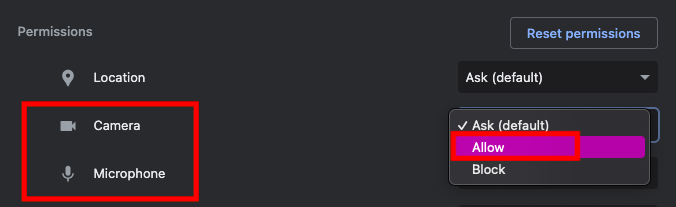
1. Click on the padlock icon on the left hand side of the URL bar
2. Click on site settings
3. Open the camera and microphone permissions
4. Allow Dojah.io to access your camera and microphone
5. Refresh the page

Mozilla Firefox
1. Open the Firefox permissions tab by clicking on the settings widget on the URL bar
2. Allow Dojah.io to use the camera and microphone by clearing the permissions
3. You will be prompted to allow Dojah.io to use your camera. Click Allow
4. You will be directed to the verification flow where your camera will be used to take the photos necessary for the ID verification
Safari
1. If you just ignored the permission pop-up on first time, simply refresh the page and allow our service to use your web camera and microphone
2. If that didn't help, open "Preferences"
3. Click "Websites" tab and make sure both Camera and Microphone are allowed for our site
Alternative method:
1. Open Settings for This Website
2. Click on Camera and Microphone settings
3. Choose Allow for both permissions
Mobile devices
When your camera is not enabled for mobile devices you will typically see a black screen instead of a camera stream. To solve the problem
General
If you have already given our service a permission to use your web camera and microphone, but you are still seeing the troubleshooting page, make sure you have allowed access to your camera for the device you are using.
Follow the instructions below to enable your camera and/or microphone access on your device.
Windows 10:
Settings -> Privacy -> Camera & Settings -> Privacy -> Microphone
Related Articles
Is the selfie taken during onboarding verifies against the picture from the government ID?
Yes, once your government data is layered with a selfie verification, your users have to take a live selfie image of themselves during onboarding and verification. The selfie image is then compared and verified against the image being returned from ...What if my user now has facial hair compared to the image on their government data?
One of the features we have taken into consideration when building this solution is the fact that people age, facial features such as facial hair, hair style/cut etc. also change. All of these have been factored in when building and training the AI ...Is there an API for Liveness check?
Yes, you can integrate liveness check via API, please see documentation here. You can also integrate the following via API; BVN and selfie - see here. NIN and selfie - see here. Selfie and Photo ID - see here.How do I add a member of my team to my dashboard?
To add a new team member, Kindly follow the steps below: Log in to your dashboard here On the left pane, scroll down and click on Settings. Then click on 'Team' On the Teams page, at the top right, click on ‘Invite a member’ Inviting a member ...How do I know when my wallet balance is low?
By default you get notified when your wallet balance is low as low as ₦500. You can, however, set a threshold on your account that automatically sends you a notification when your balance gets to a certain amount, that way you are able to top up ...